Smart Tips are interactive bubbles that provide contextual explanations exactly where users need them—such as next to input forms to ensure accurate data entry. By using attention-grabbing beacons, you can also use these tips to proactively highlight new features.
How to Create Smart Tips?
1- Create a Smart Tip
- Go to the Smart Tips section in the Usetiful Dashboard.
- Click on Add Smart Tips
- Click on Add Tip and give it a name.
- Use the select Element button to choose the specific element your Smart Tip will be attached. Find out more here.
2- Set the Orientation against element
- Choose the placement of your Smart Tip relative to the element (e.g., top, bottom, left, or right).
3- Configure 'Close on' Behaviour
- Automatically: The Smart Tip will close automatically based on the trigger event.
- Clicking on the Close Button: Allow users to manually close the Smart Tip by clicking a close button.
4- Choose a Trigger for Displaying the Smart Tip
- Mouseover element: When a user goes with the cursor above the element.
- Click on element: When a user clicks on the element.
- Focus on element: When a user gets inside the input field.
5- Enable and Customize the Hotspot Beacon (Optional)
The Hotspot Beacon is an optional feature that highlights the location of the Smart Tip.

Beacon Styles
- Pulsating Point: A subtle animated dot.
- Question Mark: A visual cue suggestion additional information.
- Information Icon: A classic i icon indication details.
Beacon Positioning
- Top: Above the element.
- Bottom: Below the element.
- Left: To the left of the element.
- Right: To the right of the element.
Alignment
- Align to Beacon: The Smart Tip bubble will show next to the beacon.
- Align to Element: The Smart Tip bubble will show next to the element.

Offset Adjustment
This allows you to shift the beacon horizontally or vertically for precise alignment.
Advanced Trigger options
In the Trigger section, define how the Smart Tip appears:
- Targeting the Element: The Smart Tip bubble will appear when the user interacts with the element (e.g., click or hover).
- Targeting the Beacon: the Smart Tip bubble will appear when the user interacts with the beacon (e.g., click or hover).
- Both: Combine element and beacon targeting for better flexibility.
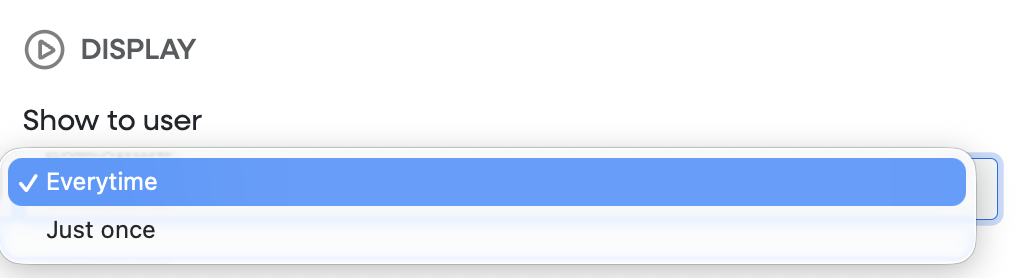
6- Configure Display Options
In the Settings, you can define where and how often the Smart Tip will show:
Show to User: Choose whether the Smart Tip is displayed every time the conditions are met or only once per user.
Note: "Showing just once" means the user can see and interact with the Smart Tip multiple times during their initial view. Once the page is refreshed, the Smart Tip will disappear.
Page Targeting: Limit the Smart Tip to specific pages or conditions. Learn more here.
Theme: If you have a custom layout Theme, you can. assign it to your Smart Tip.